How to Host a Node.JS Application With cPanel
To deploy a Node.js application on cPanel might seem a bit tricky at first, especially if you’re more accustomed to traditional PHP deployments. But don’t worry! By the end of this guide, you’ll be confident enough to get your Node.js app up and running on cPanel smoothly.
- How to Host a Node.JS Application With cPanel
- Why Deploy Node.js on cPanel?
- Before We Begin: Prerequisites
- Step 1: Accessing cPanel
- Step 2: Create a New Node.js Application
- Step 3: Upload Your Application Files
- Step 4: Install Dependencies
- Step 5: Connecting to Your Database (Optional)
- Step 6: Restart Your Application
- Step 7: Setting Environment Variables (Optional)
- Video Tutorials
- Troubleshooting Common Issues
- Securing Your Node.js Application
- Final Thoughts
- Frequently Asked Questions (FAQs)
Let’s dive into every detail, from setting up your environment to troubleshooting common issues.
Why Deploy Node.js on cPanel?
cPanel is one of the most popular web hosting control panels. It’s user-friendly, robust, and widely supported by hosting providers. If you’re developing with Node.js, deploying on cPanel allows you to take advantage of its powerful management tools while enjoying the speed and flexibility of Node.js.
Before We Begin: Prerequisites
Before diving into the deployment process, make sure you have the following ready:
- A Node.js Application: You should have a working Node.js application ready for deployment.
- cPanel Access: You’ll need access to your cPanel account, including your username and password. If you don’t have cPanel hosting, follow this guide to acquire it: “How to Buy cPanel Hosting”
- SSH Access (Optional): While some methods don’t require SSH, it’s highly recommended for easier management and deployment. Contact your hosting provider if you’re unsure how to enable SSH.
- Basic Understanding of Node.js and npm: Familiarity with Node.js and npm (Node Package Manager) will be beneficial.
Step 1: Accessing cPanel
Log into your cPanel dashboard. This is usually accessible at https://yourdomainname.com/cpanel or by visiting the hosting services page of your account dashboard.
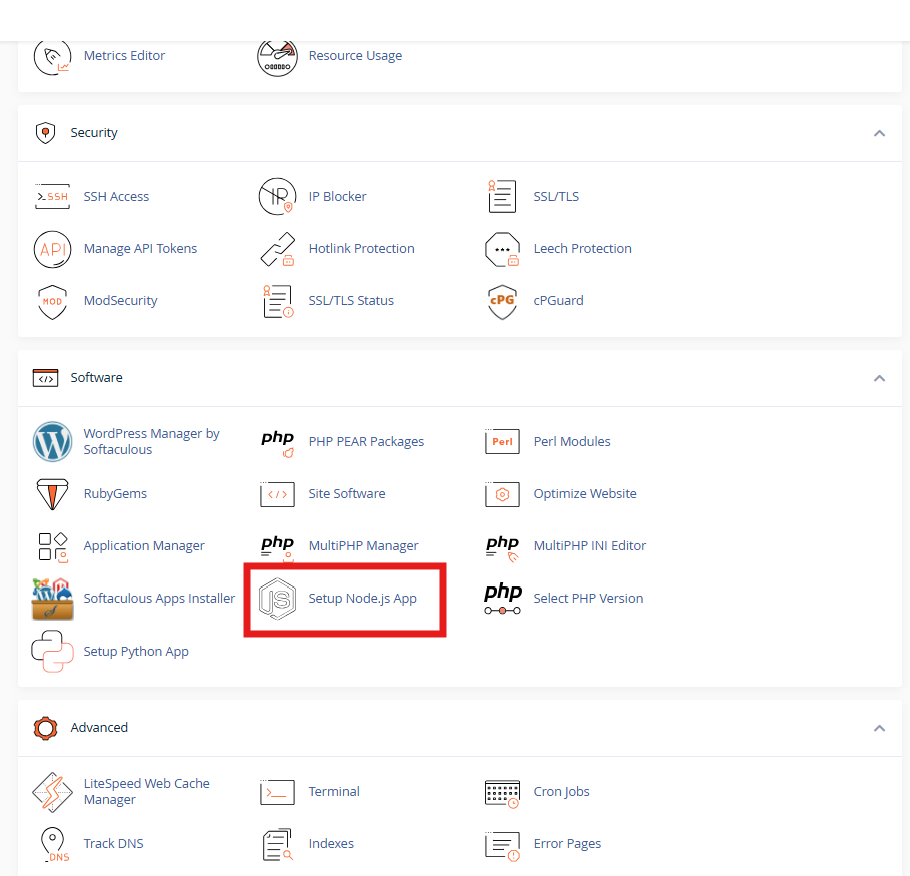
Once inside the cPanel, locate the “Setup Node.js App” feature.
Step 2: Create a New Node.js Application
- Scroll down to the Software section.
- Click Setup Node.js App.
- Click Create Application and configure the following:
- Node.js Version: Select the required version.
- Application Mode: Choose Production.
- Application Root: Enter the directory where you will upload your app (e.g.,
/home/username/app). - Application URL: Choose the domain or subdomain.
- Application Startup File: Enter
server.js(or your app’s main file).
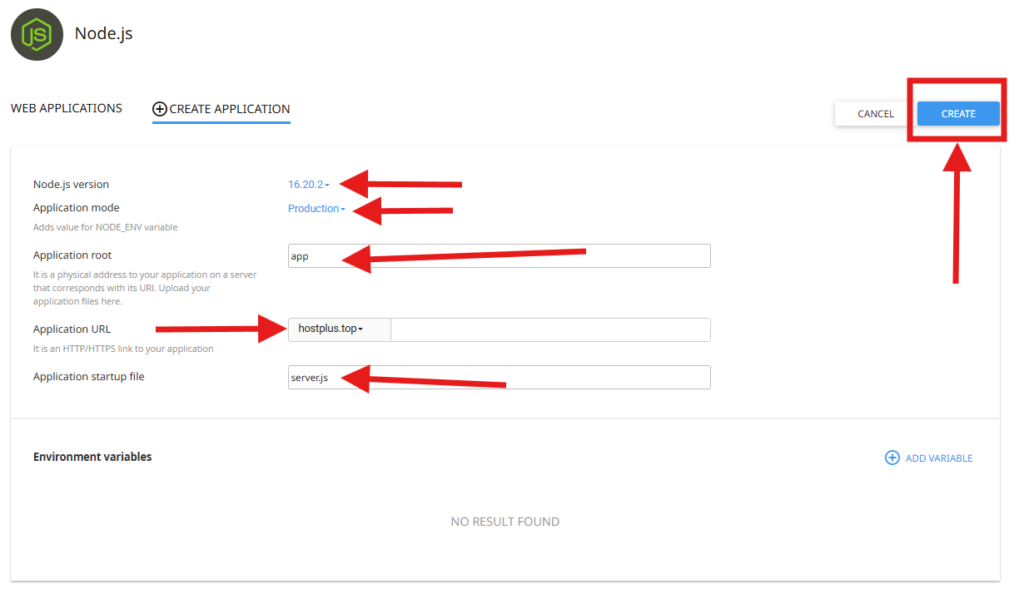
- Click Create.
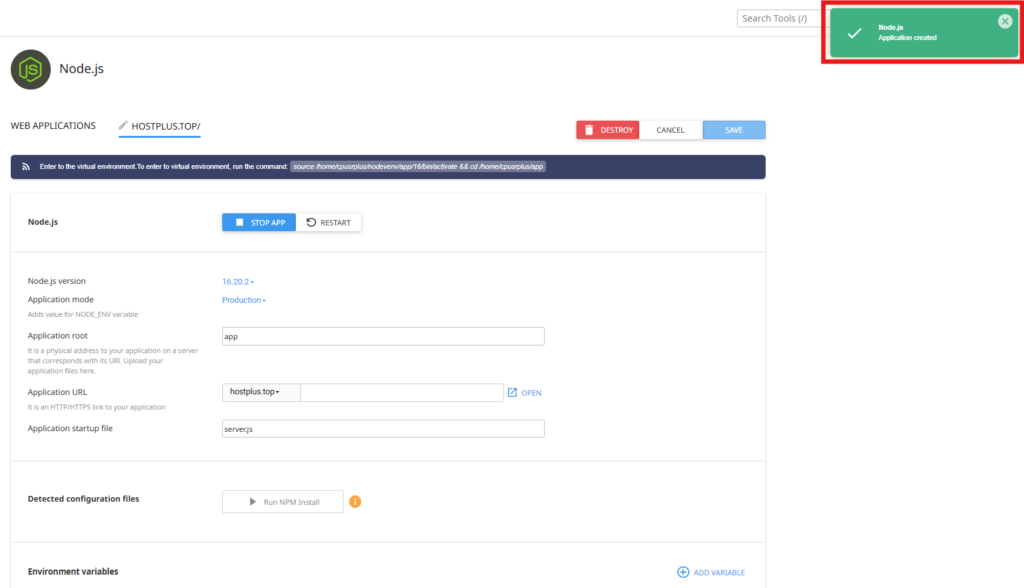
Congratulations! Your Node.js application has been successfully created. You can now visit your domain, where you should see a confirmation message similar to “It works! NodeJS 16.20.2“.

Step 3: Upload Your Application Files
- Open File Manager in cPanel.
- Navigate to the application root directory (e.g.,
/home/username/app).

- Upload your project files, including
package.jsonandserver.js. On your local machine, navigate to your Node.js project folder and create a zip archive of your project files. While generally not recommended due to its size, including thenode_modulesfolder in the zip archive is advisable if your cPanel hosting does not support terminal access or if thenpm installcommand fails when executed via the terminal.
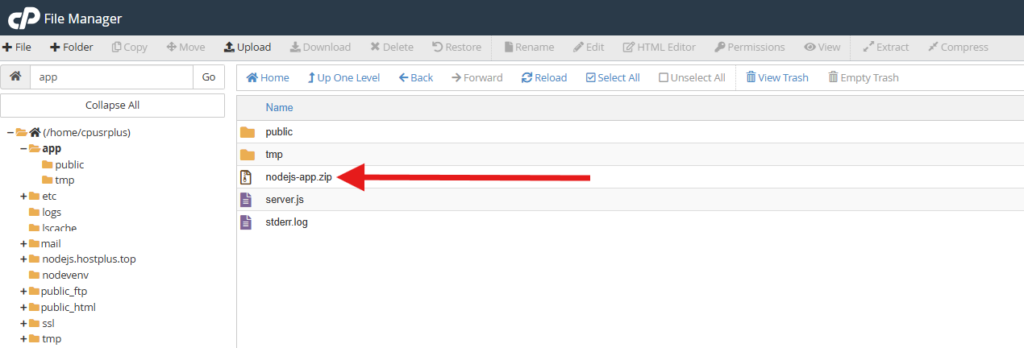
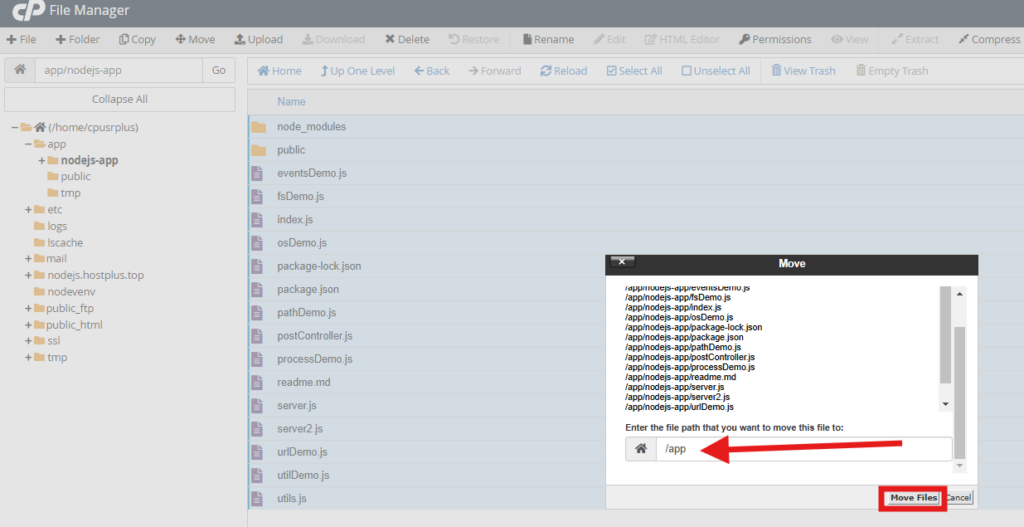
- Extract the uploaded archive. Once extracted, navigate into the resulting folder, select all the files and folders within, and move them to your application directory (e.g.,
/app).
Suggested Reading: How to Upload Your Website (in 3 Simple Steps)
Step 4: Install Dependencies
If you have already uploaded your node_modules folder, skip this step and proceed to Step 5 or Step 6.
- Return to Setup Node.js App.
- Click the pencil icon “Edit the Application” under the Actions column to make changes.
- Activate the Node.js environment. Click to copy the provided command and execute it in the terminal. Alternatively, you can click “Run NPM Install” to install the dependencies specified in your
package.jsonfile. While the “Run NPM Install” option is convenient, using the terminal is generally preferred, unless terminal access is unavailable on your hosting account.
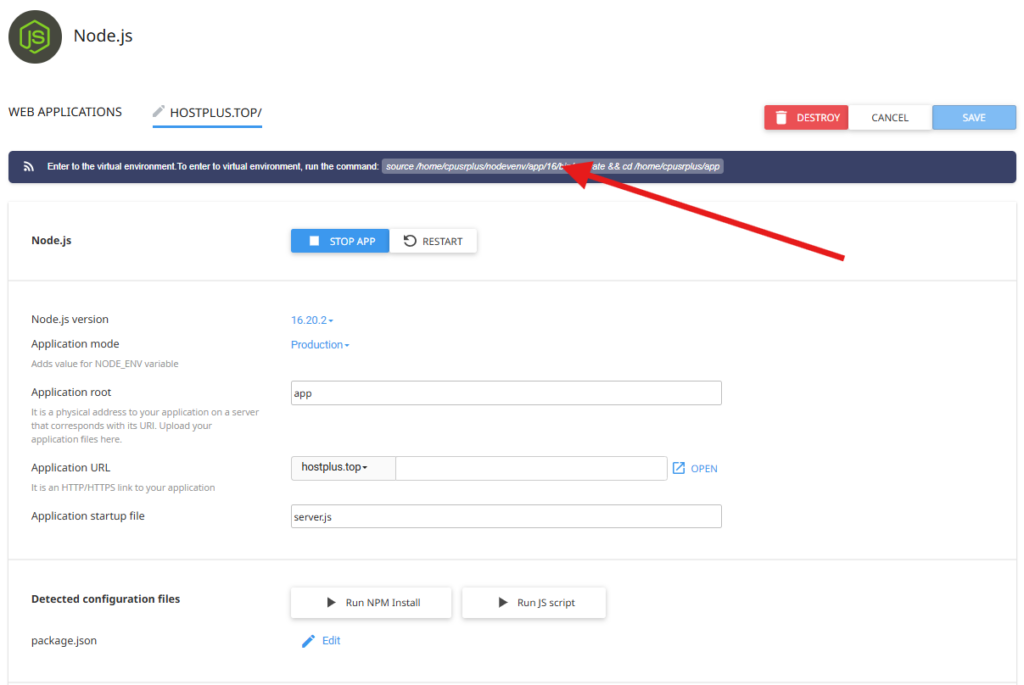
source /home/username/nodevenv/app/16/bin/activate && cd /home/username/app
Example: source /home/cpusrplus/nodevenv/app/16/bin/activate && cd /home/cpusrplus/app
(Replace 16 with your selected Node.js version.)
Access The Terminal
- Return to the cPanel dashboard
- Scroll down to the Advanced section.
- Click Terminal
- Alternatively, use the cPanel search bar at the top of the interface to locate the terminal.
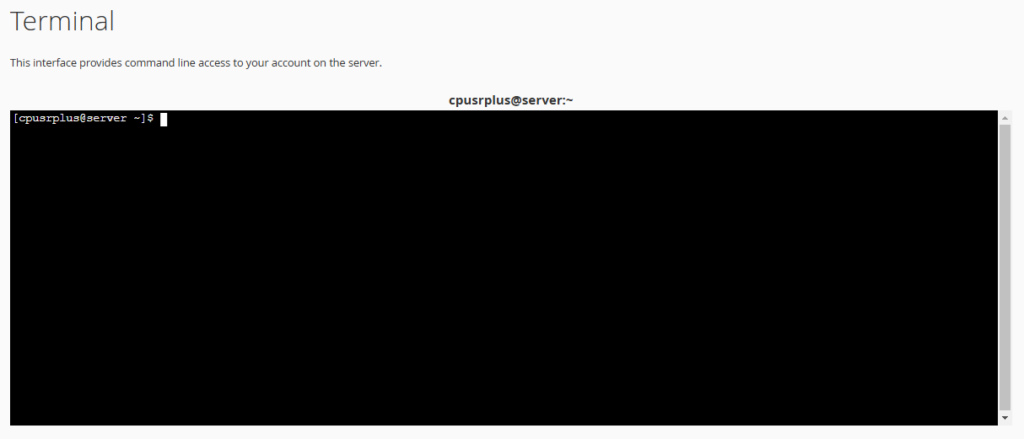
- Paste the command copied from Step 4 into the terminal to activate the Node.js environment. Then, execute
npm installto install the project dependencies.

If you encounter issues installing dependencies or if package installation is unsuccessful, there could be an issue with the installed Node.js version. Delete your current Node.js application setup and install a lower version, such as Node.js 16 or below.
Step 5: Connecting to Your Database (Optional)
If your Node.js app requires a database, follow one of the two guides below to create and configure the database within your application.
- How to Set Up a MySQL Database & User in cPanel (2 Easy Methods)
- How to Set Up a PostgreSQL Database and User in cPanel
- Locate the
.envFile- Navigate to your Node.js project directory.
- If the
.envfile is not visible, click on Settings in the top-right corner and enable Show Hidden Files (dotfiles). - If the
.envfile is still missing, re-upload it from your local machine.
- Edit the
.envFile- Open the
.envfile in a text editor. - Update the necessary database configurations as required.
- Open the
DB_HOST=localhost
DB_PORT=3306
DB_DATABASE=yourCpanelUsername_yourDbName
DB_USERNAME=yourCpanelUsername_yourDbUsername
DB_PASSWORD=yourDatabasePassword- Import your database file from your local machine
- Export your database from your local development environment (e.g., XAMPP, WAMP).
- In your cPanel, scroll down to the Databases section
- Click phpMyAdmin
- The database you created should appear in the left-hand panel. Click to select it.
- Click Import at the top to upload your database from your local machine.
Suggested Reading: How to Import a Database in phpMyAdmin
Step 6: Restart Your Application
- Return to Setup Node.js App.
- Click Restart to apply the changes
Your Node.js app is now live! 🎉
Step 7: Setting Environment Variables (Optional)
To manage sensitive data like API keys, you’ll need to set environment variables.
- In Setup Node.js App, scroll down to Environment Variables.
- Click Add Variable and enter the Name and Value. For example:
- Name:
PORT - Value:
7000
- Name:
- Save changes and restart the app.
You can then access these variables in your code using process.env.VARIABLE_NAME.
Video Tutorials
These video tutorials provide visual guidance, making it even easier to deploy your Node.js app on cPanel. Learn how to deploy to your main domain or a subdomain, following along with clear, concise demonstrations.
How To Deploy a Node.js App on cPanel Using the Main Domain (or Root Domain)
This video walks you through the process of deploying your Node.js application to your cPanel hosting account using your main domain name (e.g., domain.com). It covers setting up the necessary files, configuring your cPanel environment, and getting your app live on your primary domain. Perfect for beginners!
How To Deploy a Node.js App on cPanel Using a Subdomain
This video demonstrates how to deploy your Node.js application to a subdomain (e.g., app.domain.com) on your cPanel server. It covers the specific steps required for subdomain deployment, including setting up the subdomain in cPanel and configuring your application to run under the subdomain. Great if you want to host multiple applications on the same cPanel account!
Troubleshooting Common Issues
1. Website Showing 503 Error
If you’re unlucky, you may encounter the following error when trying to access your deployed Node.js website, as shown in the screenshot below.
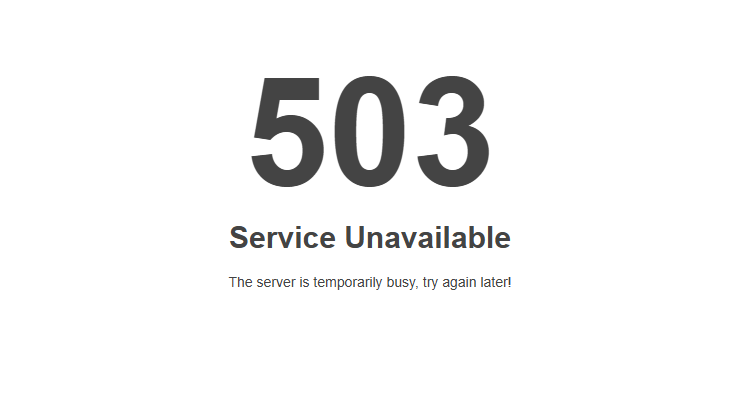
To view the error logs, navigate to your Node.js application’s root directory (e.g., /app) within the File Manager.
Right-click the stderr.log file and select “View” (or the equivalent option in your file manager) to examine its contents.
server.js is treated as an ES module file as it is a .js file whose nearest parent package.json contains "type": "module" which declares all .js files in that package scope as ES modules.
Instead rename server.js to end in .cjs, change the requiring code to use dynamic import() which is available in all CommonJS modules, or change "type": "module" to "type": "commonjs" in /home/cpusrplus/app/package.json to treat all .js files as CommonJS (using .mjs for all ES modules instead)

  code: 'ERR_REQUIRE_ESM'
}
If you encounter any of the errors displayed above, follow the corresponding steps to resolve them.
- Edit the
package.jsonfile and change"type": "module"to"type": "commonjs". - Save the
package.jsonfile. - Return to Setup Node.js App.
- Click Restart to apply the changes
- Access your site; the error should be resolved.
2. Application Not Starting
- Check the startup file path and ensure it’s correctly set.
- Check the
stderr.login your Application Directory - Look at the logs in File Manager →
logsdirectory.
3. Dependencies Not Installing
- Make sure your
package.jsonis present in the root directory. - Make sure virtual environment for Node.js applications is activated.
source /home/username/nodevenv/app/16/bin/activate #replace 16 with your Node.js version & app with your node.js application directory.- Clear cache and reinstall dependencies
npm cache clean --force
npm install
Securing Your Node.js Application
- Enable HTTPS: Use Let’s Encrypt SSL in cPanel to secure your application with HTTPS.
- Firewall Configuration: Make sure the port used by your app is open.
- Environment Variables: Never hardcode sensitive information. Always use environment variables.
Final Thoughts
Deploying a Node.js application on cPanel can be straightforward if you follow the right steps. This guide covered everything you need to get your Node.js app live on cPanel.
By leveraging cPanel’s powerful features and Node.js’s performance, you can build and deploy robust web applications effortlessly.
Happy coding! 🚀
Frequently Asked Questions (FAQs)
Use cPanel’s File Manager to navigate to your application’s root directory. Look for files named stderr.log, or similar. These files contain valuable debugging information.
Yes, you can deploy multiple Node.js applications on the same cPanel account by configuring each app with a different port and application root.
Yes! CloudLinux’ Node.js Selector allows you to deploy your application through a graphical interface without using the terminal. You can create your app, upload files, install dependencies, and restart the app—all within cPanel.
It depends on your app’s requirements. However, if you encounter issues with npm install, try using Node.js 16 or below, as newer versions may not always be fully supported by your hosting provider.
There could be several reasons. Double-check file paths, Node.js versions, and installed dependencies. Carefully examine your error logs for specific clues. Differences in the server environment (compared to your local machine) are a common source of problems.
If you make changes to your app, follow these steps:
1. Upload the updated files via File Manager or FTP.
2. Go to Setup Node.js App in cPanel.
3. Click Restart to apply the changes.
1. Open Setup Node.js App.
2. Click Edit on your application.
3. Scroll down to Environment Variables and add variables (e.g., PORT=3000).
4. Click Save and restart the app.
If your app needs a database:
1. Use MySQL or PostgreSQL in cPanel.
2. Follow the database setup guides in cPanel to create and configure it.
3. Update your app’s configuration to connect using database credentials.
Passenger is a web server module that can run Node.js applications directly. If your cPanel installation has Passenger enabled, it’s the easiest way to deploy your app. It handles the process management for you.
Suggested Reading:
- How to Deploy Laravel Project on cPanel
- How to Remove .html, .php, or Both from URLs
- How to Buy cPanel Hosting for Your Website: Beginner’s Guide
- Top 90+ Essential Linux Commands Plus Cheat Sheet
- 50+ Essential Git Commands (With Downloadable Cheat Sheet)
- How to Flush DNS Cache on Windows, Mac, Linux & Browsers
- How to Redirect HTTP to HTTPS: Ultimate Guide to Secure Site
- How To Transfer Your Domain: A Step-by-Step Guide

