So, you’ve built a stunning website, and now it’s time to get it online for the world to see! Uploading a website may seem daunting, especially if you’re new to web hosting, but don’t worry—I’ve got you covered.
In this guide, I’ll walk you through three simple methods to upload your website: using File Manager, FTP (File Transfer Protocol), and the All-in-One WP Migration plugin for WordPress users. Let’s dive in!
Step 1: Upload Your Website Using cPanel’s File Manager
If your hosting provider (like Aveshost) offers cPanel, you have a built-in File Manager that allows you to upload and manage your website files directly from your browser. This is one of the easiest ways to upload a website, especially for beginners.
How to Upload Your Website via File Manager:
- Log in to Your cPanel Account
- Open your web browser and go to your cPanel login page (usually yourdomain.com/cpanel).
- Enter your username and password provided by your hosting provider.
- Navigate to the File Manager
- Once inside cPanel, look for the File Manager option under the Files section.
- Click on File Manager, then open the public_html directory (this is the root directory where your website files should go. Alternatively, you can use a subdirectory if you have created a subdomain).
- To view hidden files (such as .htaccess, .env), click on Settings in the top-right corner and enable Show Hidden Files (dotfiles).
- Upload Your Website Files
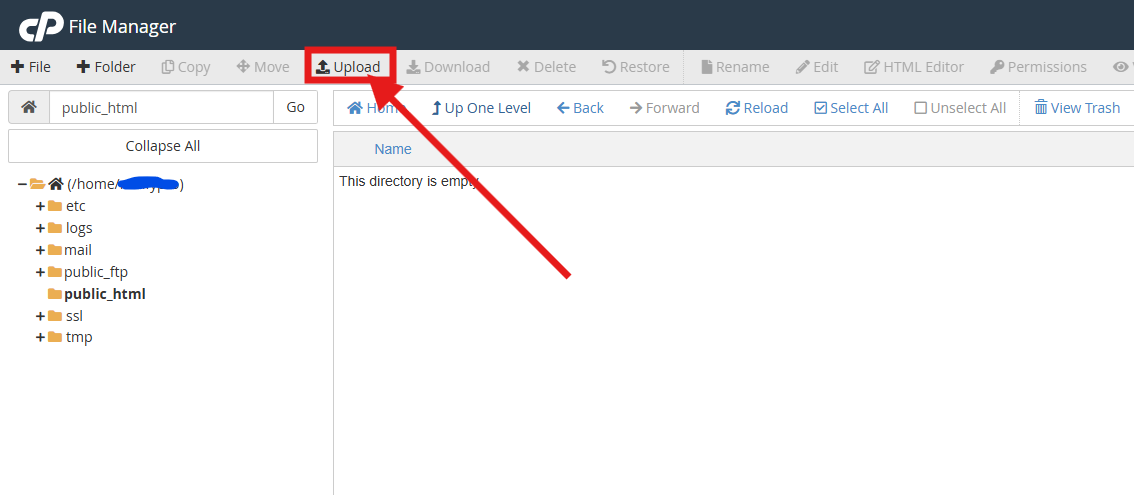
- Click the Upload button at the top of the File Manager.

- Drag and drop your website files (HTML, CSS, JavaScript, images, etc.), or click Select File to browse and upload them manually.
- If you’re uploading a ZIP file, right-click it once uploaded and choose Extract to unpack the contents.
- Move the Extracted Contents to public_html
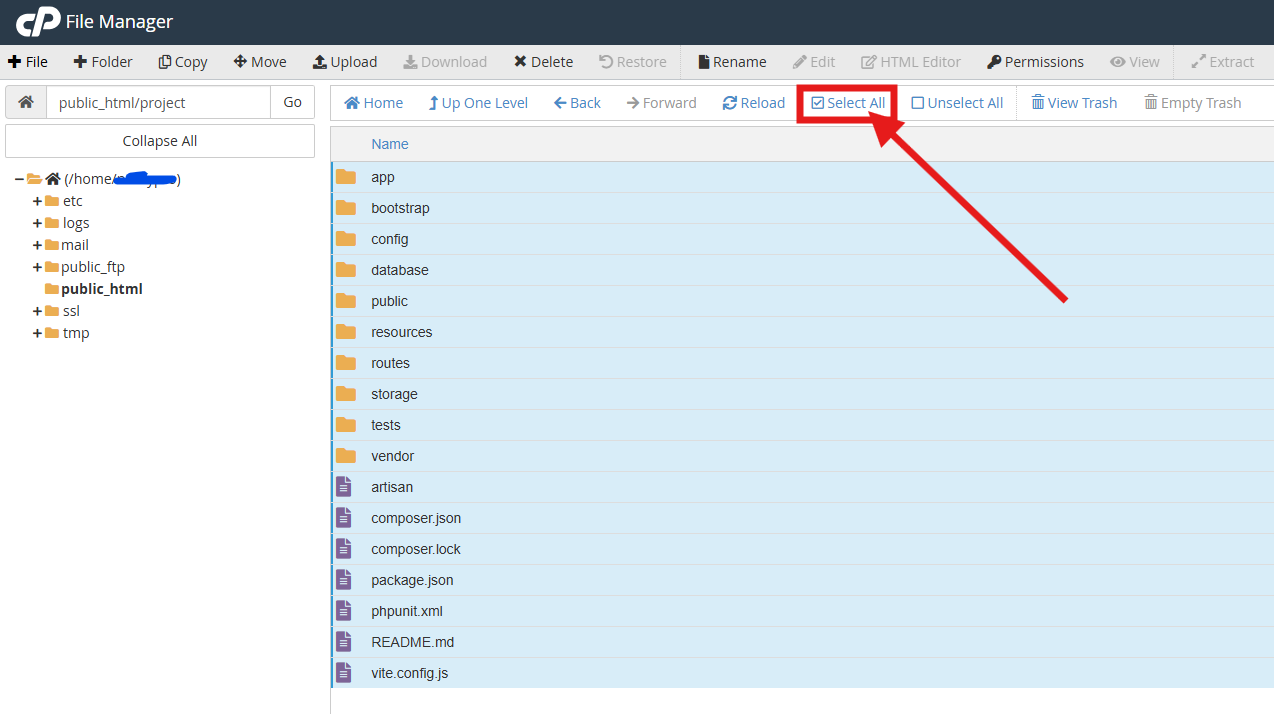
- Double click on the extracted folder and inside the folder click on Select All at the top.

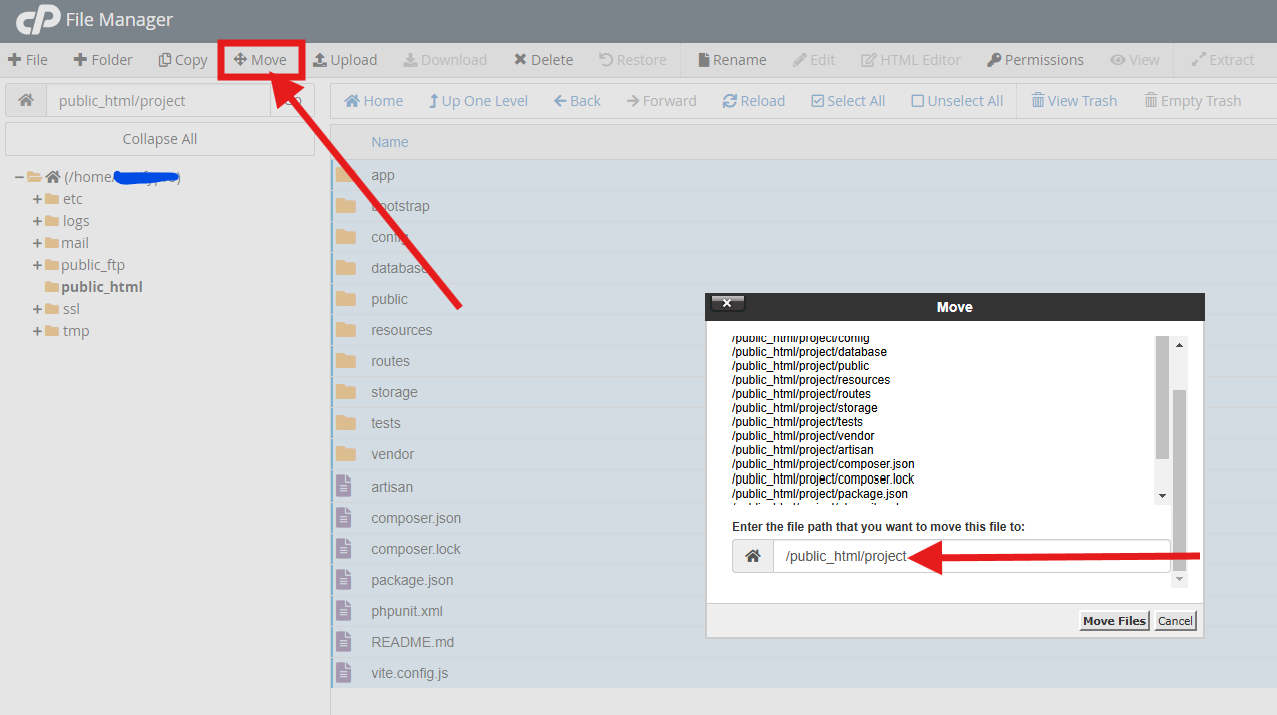
- Click on Move at the top of the File Manager, now delete the path
/projectso it should be/public_html

- Click on the Move Files button to move it into the public_html folder or the subdirectory folder in case you are using a subdomain.
- Check Your Website
- Open a new browser tab and type your domain name (yourdomain.com). If everything is uploaded correctly, your website should now be live!
Note: After extracting the files, delete the zip file. Once the files are moved to the public_html directory, delete the project folder.
✅ Best for: Small websites with basic HTML/CSS files, quick uploads, and minor file edits.
Suggested Reading: How to Create a MySQL Database & User
Step 2: Upload Your Website Using FTP (File Transfer Protocol)
If you have multiple files to upload, FTP (File Transfer Protocol) is the best option. FTP allows you to transfer files between your computer and the web server securely using an FTP client like FileZilla.
How to Upload Your Website via FTP:
- Download and Install FileZilla
- Go to the FileZilla website and download the free FileZilla Client.
- Install it on your computer and launch the application.
- Connect to Your Web Server
- In FileZilla, go to File > Site Manager > New Site.
- Enter your FTP credentials (these are provided by your web host in your welcome email or cPanel’s FTP section or create a new one. in the cPanel, go to Files > FTP Accounts):
- Host: Your domain name or server IP
- Username & Password: Provided by your host
- Port: 21 (default FTP port)
- Click Connect.
- Upload Your Files
- In FileZilla, the left panel displays your local computer files, while the right panel shows your web server files.
- Navigate to the
public_htmldirectory on the right panel. - Drag and drop your website files from the left panel to the right panel.
- Wait for the upload to complete.
- Check Your Website
- Open your browser and visit your domain to ensure your website is working properly.
✅ Best for: Large websites, multiple files, and frequent updates.
Step 3: Upload Your Website Using All-in-One WP Migration Plugin (WordPress Users)
If you’re using WordPress, the easiest way to upload or migrate a website is with the All-in-One WP Migration plugin. This method is perfect if you’re moving your website from a local server (like XAMPP) or another hosting provider.
How to Upload Your Website via All-in-One WP Migration:
- Install the Plugin
- Log in to your WordPress dashboard.
- Go to Plugins > Add New and search for All-in-One WP Migration.
- Click Install Now, then Activate.
- Import Your Website
- In the WordPress dashboard, go to All-in-One WP Migration > Import.
- Click Import from File and upload your website backup file (
.wpressformat). Before proceeding, ensure you have installed and activated the All-in-One WP Migration plugin on the other platform. Also, make sure you have exported and saved your website backup file (.wpressformat) to your PC.
- Wait for the Upload to Complete
- The plugin will handle everything, including database migration and file uploads.
- Once the import is finished, save permalinks by going to Settings > Permalinks and clicking Save Changes.
- Check Your Website
- Visit your domain and ensure everything is working correctly.
✅ Best for: WordPress users migrating an existing site or moving to a new host.
Final Thoughts
Uploading your website doesn’t have to be complicated! Whether you choose cPanel’s File Manager, FTP, or the All-in-One WP Migration plugin, each method has its benefits:
🔹 File Manager – Quick and easy for small websites.
🔹 FTP – Best for large file uploads and frequent updates.
🔹 All-in-One WP Migration – Perfect for WordPress users moving their website.
Now that your website is live, don’t forget to secure it with SSL, set up regular backups, and optimize it for speed and SEO. If you need reliable web hosting with 24/7 support, check out Aveshost! 🚀
Suggested Reading:
- How to Set Up a PostgreSQL Database and User in cPanel
- How to Set Up a MySQL Database & User in cPanel (2 Easy Methods)
- How to Flush DNS Cache on Windows, Mac, Linux & Browsers
- How to Start a Blog and Make Money in 2025: Beginner’s Guide
- Beginner’s Guide to Building a Website
- How To Transfer Your Domain: A Step-by-Step Guide
- How to Choose a Blog Name: 107+ Niche Ideas


